|
| |
Carefully unpack the unit and check for damage. Make sure that all of the required parts are included. The units are thoroughly
tested before packing to insure safe delivery and operation. If there is any sign of damage due to shipment return it to the place
of purchase for repair or replacement.
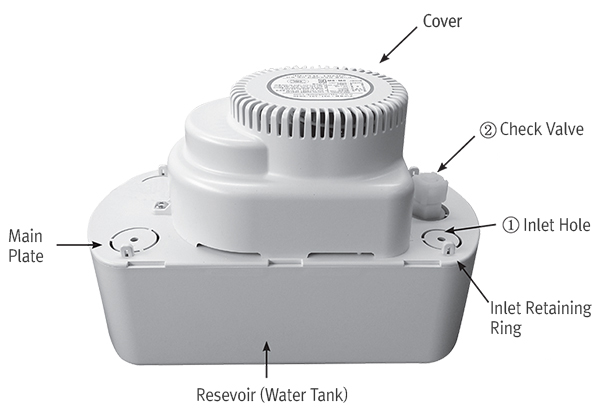
Select a mounting location near the appliance. The pump must be mounted horizontally. Run Flexible tubing or pipe from evaporator
drain into the inlet hole of pump. Be sure the inlet piping is slopped downward to allow gravity flow.
From condensate unit, extend discharge piping straight up as high as necessary, but not higher than maximum head of the pump.
Be sure that the discharge piping is not twisted or clogged.
In order to avoid siphoning action & running the pump dry, always connect the outlet piping drain at a higher level than the
pump itself.
Make sure that the power source voltage matches with the pump's requirement.
connect the pump's power cord to a constant
source of power ( not a fan, or
other device that runs intermittently). Don't connect or link the air conditioner's
power cable directly
to the pump's power cable. Use the power plugs respectively, if the pump's power cable should be extended, use a cable of same
specification. all wiring should be done by qualified service technician.
when all the above tasks are done. please perform a trial of operation.
pour water into the pump's reservoir and check if the pump
works properly.
|
|
| |
 |
|
The purpose of the safety switch is to prevent an overflow while the pump is not working due to various reasons. The lead wires of safety switch originally coming from the Factory are set to shut down the heating/AC circuit. |
| |
COM+NO
To shut down the heating/AC circuit. The lead wire to be connected in series with the Low Voltage Thermostat Circuit.
COM+NC
To Actuate an Alarm. The lead wire to be connected in series with a Low Voltage Alarm Circuit. |
|
| |
|
| |
 |
|
This pumps are not longer than 5 minutes(15%/10min)
In any installations where property damage and/or personal injury might result from an inoperative pump,
a back up system and/or ALAM(Safety Switch) should be used.
Don't twist discharge hose.
Don't handle pump with wet hands or when standing on a wet or damp surface.
Please Keep in mind that the pump are not submersible pumps.
Don't use in explosive atmosphere.
Don't use to pump hot water 50℃
Don't use to pump flammable or explosive fluids such an gasoline, fuel oil, alcohol, etc.
|
|
| |
|
| |
 |
|
Before attempting to service or disassembly any component, make sure that the unit is disconnected from the power source.
Clean the water tank with warm water and mild soup.
Be sure the floats move freely. Clean an necessary.
Disassemble the cover and water tank from the main plate.
Disassemble the discharge piping from the check valve with care not to spill the water inside of the discharge piping over the floor
or the pump. Unfasten the check valve with a wrench. Clean the check valve and be sure that the ball inside of check
valve move
freely.
Check the inlet and discharge piping clean as necessary. Be sure there no kinks in the line that would inhabit flow
After the serving, assemble the unit by the reverse order.
In case of a long-term break, remove water from the discharge piping and the water tank.
|
|
| |
|
| |
 |
|
The unit does not run |
1. Check the power supply.
2. Check the appliance to see if the condensation is actually being produced.
3. Make sure the pump float mechanism moves Freely and clicks the activation switch properly when
moving up and down,
4. Make sure the inlet piping is not clogged. If it is clogged, the appliance may eventually be damaged. |
The unite makes
loud noises
when running |
1. Make sure the inside of water tank is clean.
2. Inspect the check valve following the maintenance instructions. |
The unit runs
but does not
pump the liquid outlet |
1. Make sure the float is not stuck in the up position.
2. Clean the highest point of the outlet piping does not exceed the maximum delivery height of the pump.
3. Check the inside of outlet piping is clean.
4. Inspect the check valve following the maintenance instructions. |
Liquid drains
back into the pump
from discharge hose |
1. The check valve may have debris in it. Clean the Check valve following the maintenance instructions.
2. Make sure the pump is installed horizontally |
Liquid leaks from
around the check
valve |
1. Make sure the outlet piping tightly connected with the check valve.
2. Make sure the check valve is fastened properly.
3. Check the inside of outlet piping is clean.
4. If the O-ring under the check valve is damaged, replace with a new one. |
|
| |
|
| |
 |
|
Warranty will be VOID if any of the following Conditions are found:
Sealed motor housing opened.
Product connected to voltage other than indicated on nameplate.
Punp allowed to operate dry(fluid supply cut off).
Pump used to circulate anything other than fresh water at approximately room temperature.
Any type of product abuse by customers. |
|
| |
|
| |